I would attempt to confirm that the image you’re uploading on AWS is the image you expect. I recommend you take a second look at how you’re uploading the images. I’ve made the mistake previously, after building on a clean project, uploading the wrong image all along.

Also if you can copy the outputs from upgrading newtmgr here. That way we can confirm you are indeed getting the updated code. Also you may have to post the code that you’re using to generate the version #s.

    jaredwolff
    Hi,

    Here is the output from newtmgr:
    PS C:\Users\Zirun\ncs\v1.5.0\reliance_app\nrf9160_aws_fota> newtmgr -c serial image upload build/zephyr/app_update.bin
    176.88 KiB / 176.88 KiB [========================================================================================================================================================================================================================================================================] 100.00% 13.74 KiB/s 12s
    Done

    Here is how I defined version #:
    prj.conf:

    CONFIG_APP_VERSION="v2.0.1"
    CONFIG_USE_CLOUD_CLIENT_ID=y
    CONFIG_CLOUD_CLIENT_ID="nrf9160"
    CONFIG_MQTT_BROKER_HOSTNAME="a2v611xt1xntep-ats.iot.ca-central-1.amazonaws.com"
    CONFIG_PROVISION_CERTIFICATES=y
    CONFIG_CLOUD_CERT_SEC_TAG=20210101

    The main.c is exact the same as the aws_fota sample_.

    I have confirmed that I have changed the CONFIG_APP_VERSIONto “v2.0.2” and build with -p tag and upload the app_update.bin to s3 bucket.

      zirunhong I have confirmed that I have changed the CONFIG_APP_VERSIONto “v2.0.2” and build with -p tag and upload the app_update.bin to s3 bucket.

      Can you see that you’re updating your device using the bootloader over USB that it’s also updating to v2.0.2? It’s important to confirm this locally before you upload.

      Also, how does your device know which image to pull? How you know if it’s pulling the correct one?

        5 days later

        jaredwolff

        Hey, sorry for reply late.

        Can you see that you’re updating your device using the bootloader over USB that it’s also updating to v2.0.2? It’s important to confirm this locally before you upload.

        Yes, I try changing the hard-coded version to “v2.0.2” and using printk() to verify it.

        Also, how does your device know which image to pull? How you know if it’s pulling the correct one?

        Hmm..that’s something I don’t fully understand, on the instruction of aws__fota sample, it says:

        The sample then retrieves the firmware image over HTTP and replaces the current firmware with the downloaded firmware.

        I guest it may have a way in bootloader to distinguish it?

        Also, I tried in this way: instead of using v2 bootloader and newtmgr, I use the debugger to program the device (west flash --runner nrfjprog). Then I changed the hardcoded version, build with -p tag, upload the app_update.bin to S3 bucket, following the same process of FOTA, and in next reboot after fota download complete, it loaded with the new firmware from S3 (according to the hard-coded version using printk()). I wonder if it is because of the v2 bootloader? Do you have any comment/suggestion on it?

        Thanks!
        Zirun

          zirunhong I don’t have any further suggestions. Looks like it’s working now though? If not, I would carefully read the instructions related to FOTA. It’s important you indicate the correct image in. S3 for it to work. (I recommend removing the old images when you’re done with them.)

            4 days later

            jaredwolff
            It is working now when uploading the hex file. However, another problem came out, I cant use newtmgr to upload the firmware. When I try to enter DFU mode by holding MODE button and tap RESET button, it didn’t looks like entering the DFU mode, and newtmgr -c serial image upload build/zephyr/app_update.bin doesn’t work. I have the CONFIG_BOOTLOADER_MCUBOOT=y in my prj.conf

              zirunhong make sure with v2 that you’re holding the MODE button and tapping the RST. Let go of the MODE once you have a blue LED. I added a delay in the bootloader so the device wouldn’t accidentally go into bootloader mode in some operating edge cases.

                jaredwolff

                Hi, thanks for reply.

                I have try with the instruction and still the same. I have no problem with uploading the bin file with your v2 bootloader.

                My concern is when I use my our bootloader, it doesn’t go to DFU mode. First, my understanding is, when compiling the application with CONFIG_BOOTLOADER_MCUBOOT=y in prj.conf, there will be a bootloader firmware/image being created, this should be the hex file in /build/mcuboot/zephyr/zephyr.hex . Please correct me if I am wrong.

                Then for application, we can use newtmgr to flash the app_update.bin to the board. The bottle neck I have here is, my bootloader firmware doesn’t allow the board into DFU mode, which I cant flash the binary file for the application.

                Thanks,
                Zirun

                  zirunhong My concern is when I use my our bootloader, it doesn’t go to DFU mode. First, my understanding is, when compiling the application with CONFIG_BOOTLOADER_MCUBOOT=y in prj.conf, there will be a bootloader firmware/image being created, this should be the hex file in /build/mcuboot/zephyr/zephyr.hex . Please correct me if I am wrong.

                  That’s slightly correct. When CONFIG_BOOTLOADER_MCUBOOT is selected it will generate a file call merged.hex which will contain the bootloader. zephyr.hex alone on the nRF9160 will not work. You’ll always need a merged.hex. (I believe it’s generate whether or not the bootloader is enabled.)

                  zirunhong these two statements seem to contradict each other:

                  I have no problem with uploading the bin file with your v2 bootloader.

                  The bottle neck I have here is, my bootloader firmware doesn’t allow the board into DFU mode, which I cant flash the binary file for the application.

                  Can you explain what you mean? You’re able to use newtmgr but not load via AWS FOTA? If I were you I’d compile and run the provided SDK examples and follow Nordic’s instructions explicitly. Make sure you can do it with unmodified code an then work on getting your own firmware working with it as well.

                    jaredwolff

                    Hi thanks for your reply. Sorry for the confusion.

                    Can you explain what you mean? You’re able to use newtmgr but not load via AWS FOTA?

                    There are two different tries, compiling is fine, no error:

                    1. Using your v2 bootloader source here, then I go into DFU mode with the instruction and flash app_update.bin with CONFIG_APP_VERSION="v1.0.0", using newtmgr -c serial image upload build/zephyr/app_update.bin.
                      Code works, download the app_update.bin with CONFIG_APP_VERSION="v2.0.0". Then restart and still print “v1.0.0” on the USB console, which shows the firmware running on the board is not updated.

                    2. I use nRF Connect v3.6.1 - Programmer to erase the device first. Then I use flash the merged.hex under /build/zephyr after seeing your reply using west flash. However, I cant enter the DFU mode, but code works, download the app_update.bin with CONFIG_APP_VERSION="v2.0.0". Then restart and still print “v2.0.0” on the USB console, which shows the firmware is updated. I try to enter DFU mode and it still cant access. I have followed the instruction on entering DFU mode.

                    I wonder if it is the difference in bootloader causing the problem. If so, what makes it different, clearly there is nothing on the example source code related to bootloader setting or DFU setting, plus they are using the same source code.

                    If I were you I’d compile and run the provided SDK examples and follow Nordic’s instructions explicitly. Make sure you can do it with unmodified code an then work on getting your own firmware working with it as well.

                    So I am using the AWS_fota example. I didn’t chang anything from the source code, except for adding few configurations in prj.conf:

                    # FOTA config
                    CONFIG_APP_VERSION="v1.0.0"
                    CONFIG_USE_CLOUD_CLIENT_ID=y
                    CONFIG_CLOUD_CLIENT_ID="nrf9160"
                    CONFIG_MQTT_BROKER_HOSTNAME="a2v611xt1xntep-ats.iot.ca-central-1.amazonaws.com"
                    CONFIG_PROVISION_CERTIFICATES=y # I also upload my AWS certificate in 'certificate.h'

                    Thanks
                    Zirun

                      zirunhong hmm thanks for the details. So it looks like FOTA and loading via USB does not work. Since they both don’t work that makes a bit more sense.

                      By the way, when you load merged.hex your overwriting the bootloader with your own. The default baud for an unmodified bootloader is 115200. (thus the likely newtmgr timeouts)

                      Have you tried FOTA with #2?

                        You can also try this bootloader. I’ll get the example running here to see if there are any gotchas. Sorry this has been such a pain!

                        jaredwolff Thanks for the reply!

                        Have you tried FOTA with #2?

                        Yes, I tried FOTA with #2 approach and it works and updated the image on next boot.

                        You can also try this bootloader.

                        I tried with this first, is the same result as #1 I mentioned on last reply.

                        Additionally, I found this github source, when I compare mine under the same directly in the SDK, it is slightly different:

                        # Disable Zephyr console
                        CONFIG_CONSOLE=n
                        CONFIG_CONSOLE_HANDLER=n
                        CONFIG_UART_CONSOLE=n
                        
                        # Multithreading
                        CONFIG_MULTITHREADING=y
                        
                        # MCUBoot settings
                        CONFIG_BOOT_MAX_IMG_SECTORS=256
                        
                        # MCUboot serial recovery
                        CONFIG_MCUBOOT_SERIAL=y
                        CONFIG_BOOT_SERIAL_DETECT_PORT="GPIO_0"
                        CONFIG_BOOT_SERIAL_DETECT_PIN=12
                        CONFIG_BOOT_SERIAL_DETECT_PIN_VAL=0
                        
                        # Size of mcuboot partition
                        CONFIG_SIZE_OPTIMIZATIONS=y

                        Latest found:

                        I check the sdk-mcuboot version using git log:

                        commit 858dd034f6565bcab5ed780e48aa713994ca1b7d (HEAD, tag: v1.7.99-ncs1-rc1, tag: v1.7.99-ncs1, manifest-rev)
                        Author: Andrzej Puzdrowski <andrzej.puzdrowski@nordicsemi.no>
                        Date:   Mon Feb 8 12:46:06 2021 +0100
                        
                            [nrf temphack] prj.conf: don't use CONFIG_LOG_MODE_MINIMAL yet
                            
                            MCUboot was updated to newer version which uses refactored
                            LOG Kconfig keyword not available in sdk-zephyr yet.
                            
                            Revert this commit on the next upmerge.
                            
                            Signed-off-by: Andrzej Puzdrowski <andrzej.puzdrowski@nordicsemi.no>

                        On github, the newest one is 1.8.0-dev . Will that be the case why my bootloader doesn’t work? Should I try with the newest version?

                        Zirun

                          zirunhong after investigating some more, I definitely recommend you build your own bootloader and use that with Amazon AWS. The reasons are two fold:

                          • There is no one bootloader that supports all versions of NCS. Every time Nordic changes something in the partition manager, it makes the previous bootloader inoperable.
                          • You should secure your bootloader with a non-default signing key.

                          I updated the documentation about creating your own signing key.

                          zirunhong Additionally, I found this github source, when I compare mine under the same directly in the SDK, it is slightly different:

                          NCS >1.5.0 has the bootloader code that I submitted as a PR that handles the LED plus the bootlader delay. That way you can build your own bootloader/application and have the same functionality of the factory bootloader.

                          Working on NCS 1.5.1 and the factory bootloader here were my results:

                          Using the instructions here I set up my S3 bucket, etc.

                          Once set up I also updated

                          CONFIG_CLOUD_CLIENT_ID="feather-xxxx"
                          CONFIG_MQTT_BROKER_HOSTNAME="xxxx-ats.iot.us-east-1.amazonaws.com"

                          They seem to be the only things that need to be added to prj.conf

                          I downloaded the cert, private key and the Amazon Root CA1. Popped those in nRF Connect for Desktop and wrote them to the device.
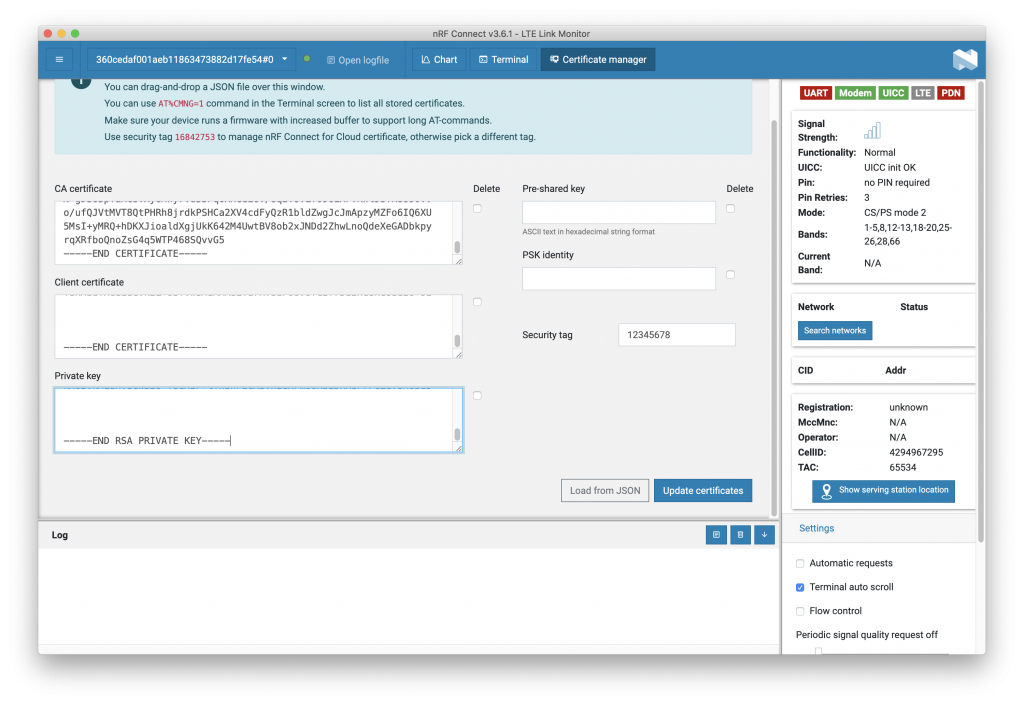
                          (I used the default security tag of 12345678)

                          Remember the device needs to be on but not connected (Using AT+CFUN=4 in order to add the certs.) Once complete setting AT+CFUN=0 is always a good idea.

                          A successful connection looks like:

                          2021-05-03T16:29:58.240Z DEBUG modem << MQTT AWS Jobs FOTA Sample, version: v1.0.0
                          2021-05-03T16:29:58.241Z DEBUG modem << Initializing modem library
                          2021-05-03T16:29:58.447Z DEBUG modem << Initialized modem library
                          2021-05-03T16:29:58.449Z DEBUG modem << LTE Link Connecting ...
                          2021-05-03T16:30:03.254Z DEBUG modem << LTE Link Connected!
                          2021-05-03T16:30:03.486Z DEBUG modem << IPv4 Address 3.224.183.138
                          2021-05-03T16:30:03.488Z DEBUG modem << client_id: feather-xxxxx
                          2021-05-03T16:30:08.503Z DEBUG modem << [mqtt_evt_handler:182] MQTT client connected!
                          2021-05-03T16:30:09.155Z DEBUG modem << [mqtt_evt_handler:235] PUBACK packet id: 17463
                          2021-05-03T16:30:09.216Z DEBUG modem << [mqtt_evt_handler:245] SUBACK packet id: 2114
                          2021-05-03T16:30:09.472Z DEBUG modem << [mqtt_evt_handler:235] PUBACK packet id: 20067
                          2021-05-03T16:31:10.994Z DEBUG modem << [mqtt_evt_handler:250] default: 9
                          2021-05-03T16:32:12.008Z DEBUG modem << [mqtt_evt_handler:250] default: 9

                          Then I created a job..

                          Running the update with the compiled bootloader works. While using the stock v2 bootloader does not work. Exactly as you were seeing @zirunhong. My earlier recommendation still stands considering the situation.

                          jaredwolff Thanks for the reply!

                          which version of the SDK are you running?

                          I use v1.5.0, I used the instruction here.

                          NCS >1.5.0 has the bootloader code that I submitted as a PR that handles the LED plus the bootlader delay. That way you can build your own bootloader/application and have the same functionality of the factory bootloader.

                          I see, I will try v1.5.1 to see if any progress.

                          after investigating some more, I definitely recommend you build your own bootloader and use that with Amazon AWS.

                          Yes, eventually we will have our application with FOTA feature, so to have our bootloader with our own key is definitely necessary.

                          I updated the documentation about creating your own signing key.

                          Thanks for the update, I will check it out.

                          Zirun

                            Terms and Conditions | Privacy Policy